How Do You Dispute A Charge On Apple Pay? A Comprehensive Guide
Ever found yourself scratching your head over an unfamiliar charge on Apple Pay? You're not alone, buddy. Whether it's a fraudulent transaction or a simple mistake, knowing how to dispute a charge on Apple Pay is crucial for protecting your hard-earned cash. In this guide, we'll walk you through every step of the process, so you can take charge of your finances like a pro. No more letting dodgy charges slide!
Apple Pay has become a go-to payment method for millions of users worldwide, and for good reason. It's fast, convenient, and secure—but even the best systems can have hiccups. Sometimes, unexpected charges pop up, and when they do, you need to know how to handle them. This article will help you navigate the world of charge disputes on Apple Pay, so you can safeguard your wallet and peace of mind.
Don't panic if you spot something fishy on your Apple Pay statement. We've got you covered with practical tips, insider tricks, and expert advice. By the end of this guide, you'll be equipped with all the knowledge you need to dispute a charge on Apple Pay and get your money back where it belongs—your pocket!
Read also:Unveiling The Magic Of Age Of Wonders 4 A Comprehensive Guide
Understanding Apple Pay and Its Security Features
Before we dive into the nitty-gritty of disputing charges, let's talk about Apple Pay itself. Apple Pay is a digital wallet service that allows users to make payments using their Apple devices, like iPhones, Apple Watches, and iPads. It's designed to be secure, using advanced encryption and tokenization to protect your card information. But even with top-notch security, mistakes happen, and that's where dispute processes come into play.
How Does Apple Pay Work?
Here's the lowdown: When you add a credit or debit card to Apple Pay, the app generates a unique Device Account Number (DAN) instead of using your actual card number. This DAN is used for transactions, keeping your real card info safe from prying eyes. Pretty cool, right? But sometimes, even with this added layer of security, unauthorized or mistaken charges can slip through the cracks.
Common Reasons for Disputed Charges on Apple Pay
So, why would you need to dispute a charge on Apple Pay? There are a few common scenarios where disputes arise. Let's break them down:
- Fraudulent Transactions: Someone gains access to your account and makes unauthorized purchases.
- Merchant Errors: A merchant accidentally charges you twice or overcharges you.
- Subscription Charges: You forgot about a subscription or didn't realize you were signed up for one.
- Refund Issues: You returned an item, but the refund never showed up.
Whatever the reason, knowing how to dispute these charges is key to resolving the issue quickly and efficiently.
How to Check Your Apple Pay Transactions
Before you start disputing charges, you need to verify that the charge is indeed incorrect. Here's how you can check your Apple Pay transactions:
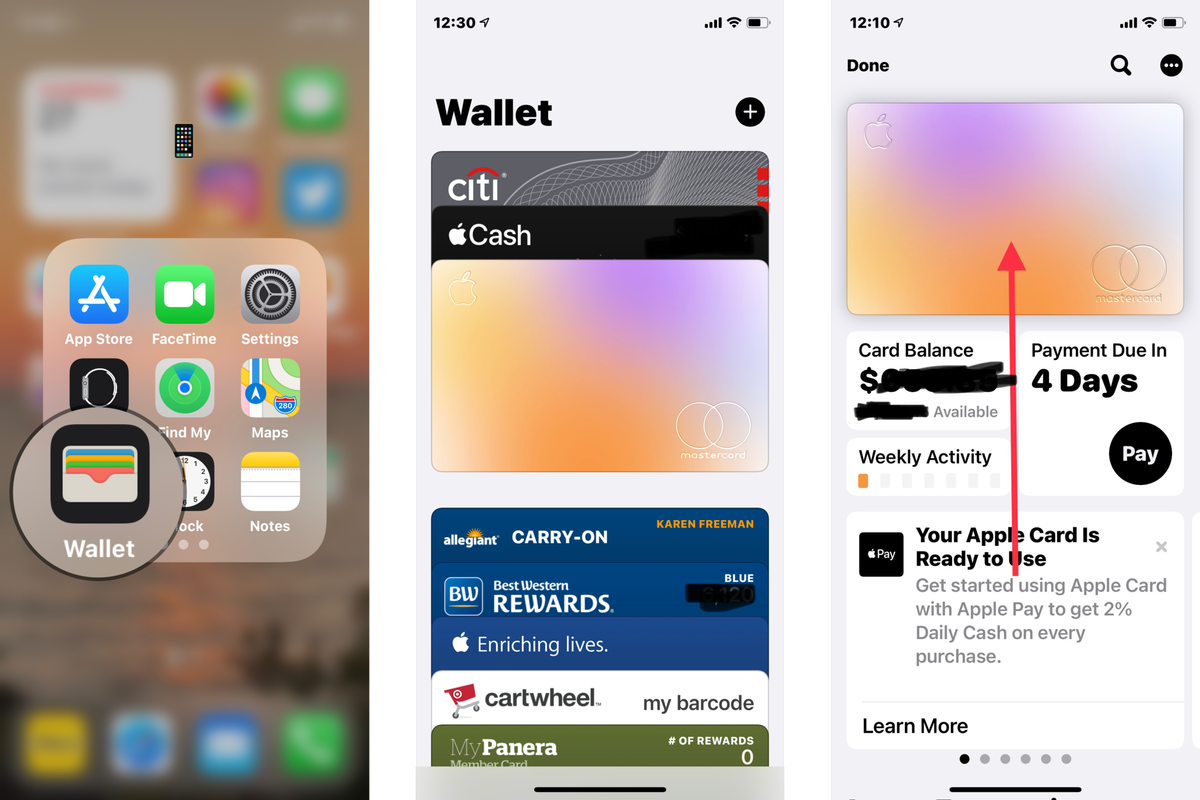
Step 1: Open the Wallet app on your iPhone. Tap the card you used for the transaction, and scroll down to view your recent transactions.
Read also:Exploring The Timeless Magic Of Moody Blues Tracks
Step 2: If you don't see the transaction details in the Wallet app, check your bank's mobile app or website. Most banks integrate Apple Pay transactions directly into your account statements.
Step 3: Still unsure? Call your bank or card issuer for clarification. They can provide detailed information about the transaction and help you determine if it's legitimate.
Red Flags to Watch For
Here are some warning signs that might indicate a problematic charge:
- Unfamiliar merchant names.
- Transactions from locations you've never visited.
- Recurring charges you didn't authorize.
- Unexpected large amounts.
If you spot any of these red flags, it's time to take action!
Steps to Dispute a Charge on Apple Pay
Now that you've identified the issue, let's talk about how to dispute a charge on Apple Pay. Follow these steps to get the process rolling:
Contact Your Bank or Card Issuer
The first step is to reach out to your bank or card issuer. They handle the actual dispute process, as Apple Pay acts as a middleman between you and your financial institution. Here's how to proceed:
- Call the customer service number on the back of your card or visit your bank's website to initiate the dispute.
- Provide details about the transaction, including the date, amount, and merchant name.
- Explain why you're disputing the charge (fraud, error, etc.).
- Follow any additional steps your bank requires, such as submitting a written dispute form.
Most banks have a fraud protection policy that covers unauthorized transactions, so you might not be held responsible for the charge.
Use Apple Pay's Support Resources
While your bank handles the dispute, Apple Pay offers support resources to assist you. You can visit the Apple Support website or contact Apple Pay support directly for guidance. They can help you troubleshoot issues and provide documentation if needed.
What Happens After You Dispute a Charge?
Once you've filed a dispute, the investigation process begins. Here's what you can expect:
- Immediate Freeze: Many banks will freeze the disputed charge to prevent further activity.
- Investigation Period: Your bank will investigate the transaction, which can take anywhere from a few days to several weeks.
- Resolution: If the charge is deemed fraudulent or erroneous, your bank will issue a refund. If the charge is legitimate, you'll be notified and may need to pay the amount.
Stay patient during this process, but don't hesitate to follow up with your bank if you don't hear back within a reasonable timeframe.
Tips for Preventing Unauthorized Charges
Prevention is always better than cure, right? Here are some tips to help you avoid unauthorized charges on Apple Pay:
- Enable two-factor authentication for your Apple ID.
- Regularly review your transaction history for any suspicious activity.
- Set up alerts for transactions above a certain amount.
- Use strong, unique passwords for your accounts.
By taking these proactive steps, you can reduce the risk of fraudulent charges and keep your finances secure.
Common Mistakes to Avoid
Here are a few pitfalls to watch out for when disputing charges:
- Waiting too long to report the issue. Most banks have a time limit for filing disputes.
- Not keeping records of your communication with the bank.
- Assuming the charge is legitimate without double-checking.
Stay vigilant and organized to ensure a smooth dispute process.
Legal Protections for Apple Pay Users
As an Apple Pay user, you're protected by various legal safeguards. Under the Fair Credit Billing Act (FCBA) in the U.S., you have the right to dispute unauthorized or erroneous charges on credit cards. Debit card users are also covered under the Electronic Fund Transfer Act (EFTA).
These laws ensure that you're not held liable for fraudulent transactions, as long as you report them promptly. Make sure to familiarize yourself with your rights and responsibilities as a cardholder.
Alternatives to Disputing Charges
Sometimes, disputing a charge isn't the only option. Here are a few alternatives to consider:
- Contact the Merchant: If the issue is a simple error, reaching out to the merchant directly might resolve it faster.
- Check Subscription Settings: If the charge is related to a subscription, review your settings and cancel if necessary.
- Review Return Policies: If the dispute involves a refund, check the merchant's return policy for guidance.
Exploring these options can save you time and hassle in certain situations.
Conclusion: Take Control of Your Finances
Disputing a charge on Apple Pay doesn't have to be a headache. By following the steps outlined in this guide, you can confidently navigate the process and protect your money. Remember to stay vigilant, keep records, and don't hesitate to reach out to your bank or Apple Pay support for assistance.
Now that you're armed with knowledge, it's time to take action. If you've spotted a suspicious charge, don't wait—start the dispute process today. And if you found this guide helpful, be sure to share it with your friends and family so they can stay informed too. Together, we can keep our finances safe and secure!
Table of Contents
- How Do You Dispute a Charge on Apple Pay?
- Understanding Apple Pay and Its Security Features
- How Does Apple Pay Work?
- Common Reasons for Disputed Charges on Apple Pay
- How to Check Your Apple Pay Transactions
- Steps to Dispute a Charge on Apple Pay
- What Happens After You Dispute a Charge?
- Tips for Preventing Unauthorized Charges
- Legal Protections for Apple Pay Users
- Alternatives to Disputing Charges
Article Recommendations