How To Copy Spotify Playlist To Apple Music: The Ultimate Guide
So, you're thinking about making the big switch from Spotify to Apple Music, huh? Well, hold your horses because we’ve got you covered. Moving playlists from one platform to another can feel like decoding ancient hieroglyphs, but don’t worry—we’re here to make it as smooth as a Taylor Swift ballad. In this guide, we’ll walk you through how to copy Spotify playlists to Apple Music step by step, so you can enjoy your favorite tunes without losing a beat.
First things first, let’s address the elephant in the room: why would anyone want to leave Spotify? Maybe you’re enticed by Apple Music’s exclusive content, or perhaps you’re just tired of seeing those pesky ads on the free tier. Whatever your reason may be, the good news is that transferring your playlists doesn’t have to be a nightmare. With a bit of patience and the right tools, you’ll have your entire music library up and running on Apple Music in no time.
Now, before we dive into the nitty-gritty, let’s set the stage. This guide isn’t just some random collection of tips; it’s a comprehensive walkthrough designed to help you navigate the process with ease. Whether you’re a tech-savvy guru or a total newbie, we’ve got all the info you need to make this transition seamless. So grab your favorite snack, sit back, and let’s get started.
Read also:Lavender Orpington The Majestic Poultry Breed For Your Backyard
Understanding the Basics: What You Need to Know About Spotify and Apple Music
Before we jump into the how-to, it’s important to understand the key differences between Spotify and Apple Music. While both platforms offer a vast library of songs, they have their own unique quirks that can affect the way you transfer playlists. Here’s a quick rundown:
- Spotify is known for its personalized recommendations and massive user base, but its playlists are tied to its platform-specific format.
- Apple Music, on the other hand, boasts a more polished interface and deeper integration with Apple devices, making it a top choice for iPhone users.
- The main challenge lies in the fact that neither platform natively supports direct playlist transfers, so we’ll need to use third-party tools or manual methods to get the job done.
Got it? Great! Now that we’ve laid the groundwork, let’s move on to the fun part: actually copying those playlists.
Step-by-Step Guide: How to Copy Spotify Playlist to Apple Music
Alright, buckle up because we’re about to take you on a journey. Here’s a step-by-step guide to help you copy your Spotify playlists to Apple Music:
Step 1: Export Your Spotify Playlist
The first step is exporting your playlist from Spotify. This can be done using third-party tools or manually. Let’s explore both options:
- Using Third-Party Tools: Services like Spotify Transfer or Playlist Toolbox make it super easy to export your playlists. Simply log in with your Spotify account, select the playlists you want to transfer, and download them in a compatible format like CSV or M3U.
- Manual Export: If you prefer the DIY route, you can manually copy the names of the songs and artists from your playlist and paste them into a text document. It’s a bit more time-consuming, but it gets the job done.
Once you’ve exported your playlist, you’re ready to move on to the next step.
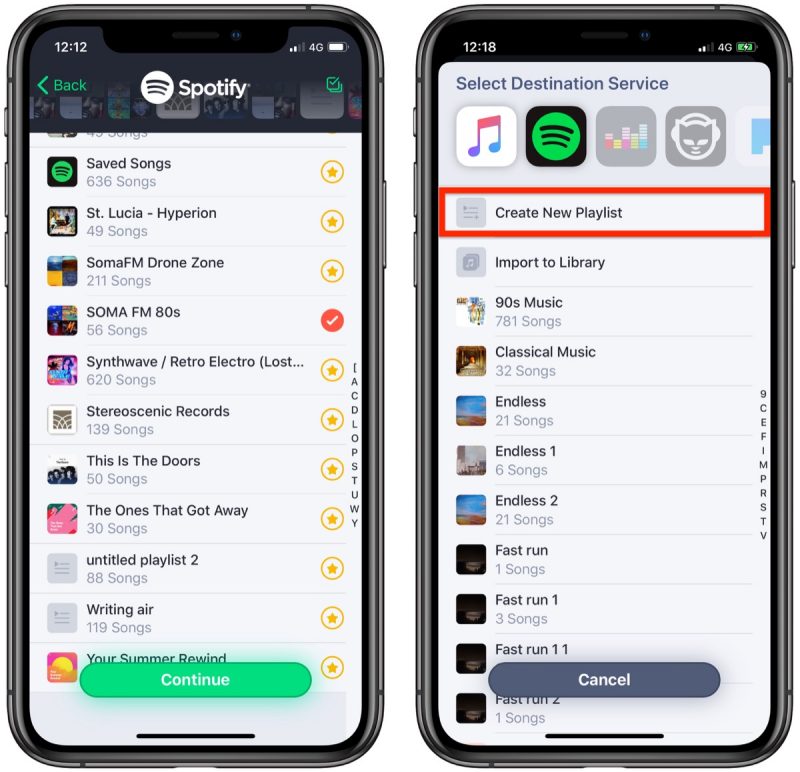
Step 2: Import Your Playlist to Apple Music
Now that you’ve got your playlist exported, it’s time to import it into Apple Music. Here’s how:
Read also:Eva Elfie And Jason Luv Exploring The Rise Of A Musical Power Couple
- Using Third-Party Tools: Many of the same tools that help you export playlists also support importing them into Apple Music. Just upload the exported file, and the tool will do the rest.
- Manual Import: If you went the manual route, you’ll need to search for each song and artist in Apple Music and add them to a new playlist. It’s a bit tedious, but it ensures that everything is exactly how you want it.
Pro tip: If you’re using a third-party tool, make sure to double-check the playlist after it’s imported to ensure everything transferred correctly.
Tools You Can Use to Simplify the Process
Let’s face it—manually transferring playlists can be a royal pain. That’s where third-party tools come in. Here are some of the best tools you can use to simplify the process:
Tool 1: Spotify Transfer
Spotify Transfer is one of the most popular tools for transferring playlists between platforms. It’s user-friendly, reliable, and supports a wide range of formats. Best of all, it’s free to use for basic features.
Tool 2: Playlist Toolbox
Playlist Toolbox is another great option for playlist transfers. It offers advanced features like playlist merging and duplicate removal, making it a must-have for serious music enthusiasts.
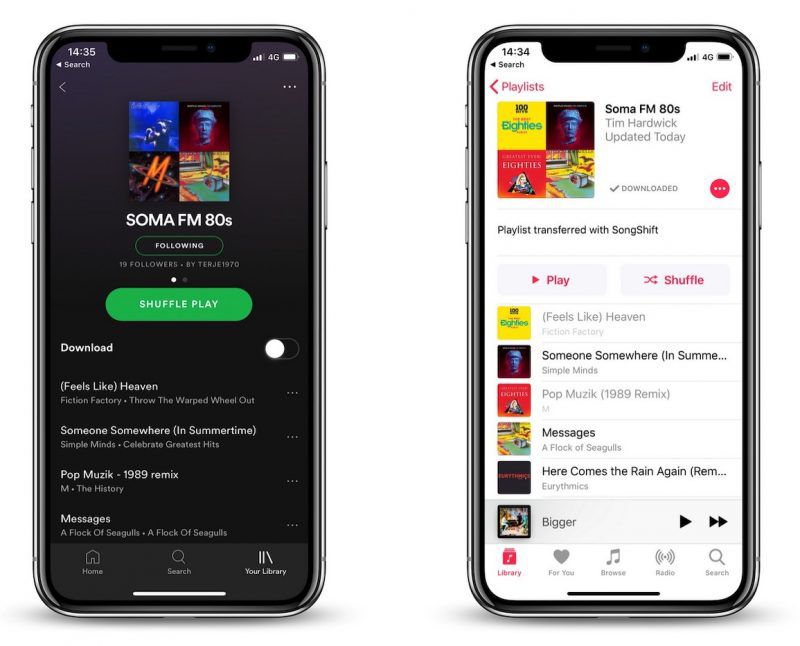
Tool 3: SongShift
SongShift is a versatile tool that supports transfers between multiple platforms, including Spotify, Apple Music, and YouTube Music. Its intuitive interface and robust feature set make it a top choice for many users.
With these tools at your disposal, transferring playlists becomes a breeze. But remember, always verify the results to ensure everything transferred correctly.
Troubleshooting Common Issues
Even with the best tools and methods, things can sometimes go wrong. Here are some common issues you might encounter and how to fix them:
Issue 1: Songs Not Found
Sometimes, songs in your Spotify playlist may not be available on Apple Music. In this case, you’ll need to manually search for alternatives or remove the song from your playlist.
Issue 2: Duplicate Songs
Occasionally, duplicate songs may appear in your imported playlist. To fix this, use a tool like Playlist Toolbox to remove duplicates automatically.
Issue 3: Playlist Order Mixed Up
If the order of your playlist gets jumbled during the transfer, don’t panic. Simply rearrange the songs manually or use a tool that supports playlist reordering.
By addressing these issues head-on, you can ensure a smoother transfer process.
Why This Process Matters: The Benefits of Cross-Platform Music Transfer
So, why go through all the trouble of transferring playlists between platforms? Here are a few reasons:
- Access to Exclusive Content: Some platforms offer exclusive tracks and albums that aren’t available on others.
- Better Integration: If you’re an Apple user, Apple Music offers seamless integration with your devices, making it a more convenient choice.
- Personalization: Transferring playlists allows you to maintain your carefully curated music collections, ensuring you never lose a favorite track.
At the end of the day, having the freedom to choose which platform works best for you is a win-win situation.
Expert Tips for a Successful Transfer
Here are a few expert tips to ensure your playlist transfer goes off without a hitch:
TIP 1: Backup Your Playlists
Always back up your playlists before starting the transfer process. This way, if something goes wrong, you can easily restore your original playlists.
TIP 2: Test the Tools First
Before committing to a particular tool, try it out with a small playlist to see how it performs. This will help you identify any potential issues early on.
TIP 3: Be Patient
Transferring large playlists can take time, so be patient and let the process run its course. Rushing things can lead to errors and frustration.
By following these tips, you’ll be well on your way to a successful playlist transfer.
Real-World Examples: Success Stories from Users
Let’s take a look at some real-world examples of users who have successfully transferred their playlists:
Example 1: Sarah’s Seamless Transition
Sarah, a long-time Spotify user, decided to switch to Apple Music after hearing about its exclusive content. Using Spotify Transfer, she was able to transfer all her playlists in under an hour. “It was so easy!” she said. “I can’t believe I didn’t do it sooner.”
Example 2: John’s DIY Adventure
John, a tech-savvy user, opted for the manual route. While it took him a bit longer, he enjoyed the process of curating his playlists himself. “I love having control over every detail,” he explained. “It’s like building a puzzle.”
These stories show that there’s no one-size-fits-all solution when it comes to playlist transfers. It’s all about finding what works best for you.
Conclusion: Take Action and Enjoy Your Music
And there you have it—a comprehensive guide on how to copy Spotify playlists to Apple Music. Whether you choose to use third-party tools or go the manual route, the key is to stay patient and persistent. Remember, the goal is to enjoy your music the way you want, so don’t let technical hurdles get in the way.
So, what are you waiting for? Start transferring your playlists today and take the first step towards a more seamless music experience. And don’t forget to leave a comment or share this article with your friends. Who knows? You might just help someone else make the switch too!
Table of Contents
- Understanding the Basics: What You Need to Know About Spotify and Apple Music
- Step-by-Step Guide: How to Copy Spotify Playlist to Apple Music
- Tools You Can Use to Simplify the Process
- Troubleshooting Common Issues
- Why This Process Matters: The Benefits of Cross-Platform Music Transfer
- Expert Tips for a Successful Transfer
- Real-World Examples: Success Stories from Users
- Conclusion: Take Action and Enjoy Your Music
Article Recommendations