How To Import Spotify Playlist To Apple Music: The Ultimate Guide
So, you've decided to switch from Spotify to Apple Music, huh? That's totally cool. But wait, what about all those playlists you've spent hours curating? Don’t worry—we’ve got you covered. Importing your Spotify playlists into Apple Music is easier than you think, and we’ll walk you through every single step. Whether you're a music enthusiast or just someone who loves their playlists, this guide will help you make the transition seamless.
Now, before we dive deep into the process, let's face it: switching music streaming services can be overwhelming. You’ve got years of playlists, favorite songs, and memories tied to Spotify. But hey, Apple Music has its own charm, and bringing your playlists over doesn’t have to be a nightmare. In this article, we’ll show you exactly how to do it without losing your sanity.
By the way, if you're reading this, chances are you're either already an Apple Music subscriber or thinking about making the switch. Either way, you're in the right place. Let’s get started and make sure your music collection stays intact while you enjoy all the perks of Apple Music.
Read also:Daniel Davis Wife Unveiling The Personal Life Of The Acclaimed Actor
Why Import Spotify Playlists to Apple Music?
Let's be honest—Spotify has been the go-to streaming platform for millions of users worldwide. But Apple Music is no slouch either. With exclusive content, lossless audio, and Spatial Audio with Dolby Atmos, it’s got some serious features that might convince you to make the switch. So, why import your playlists? Here’s the deal:
- Seamless Transition: Keep your favorite songs and playlists without starting from scratch.
- Access to Exclusive Content: Apple Music offers exclusive tracks and albums that aren’t available on Spotify.
- Advanced Audio Quality: Lossless audio and Spatial Audio give you a richer listening experience.
- Integration with Apple Ecosystem: If you're already in the Apple ecosystem, Apple Music just makes sense.
And let’s not forget—Apple Music is constantly improving. If you’re already invested in the Apple world, it’s a no-brainer to bring your playlists over. Now, let’s get into the nitty-gritty of how to do it.
Step-by-Step Guide: How to Import Spotify Playlist to Apple Music
Alright, buckle up because we’re about to take you through the process step by step. There are a few methods you can use, depending on what works best for you. We’ll cover the most efficient and user-friendly options below.
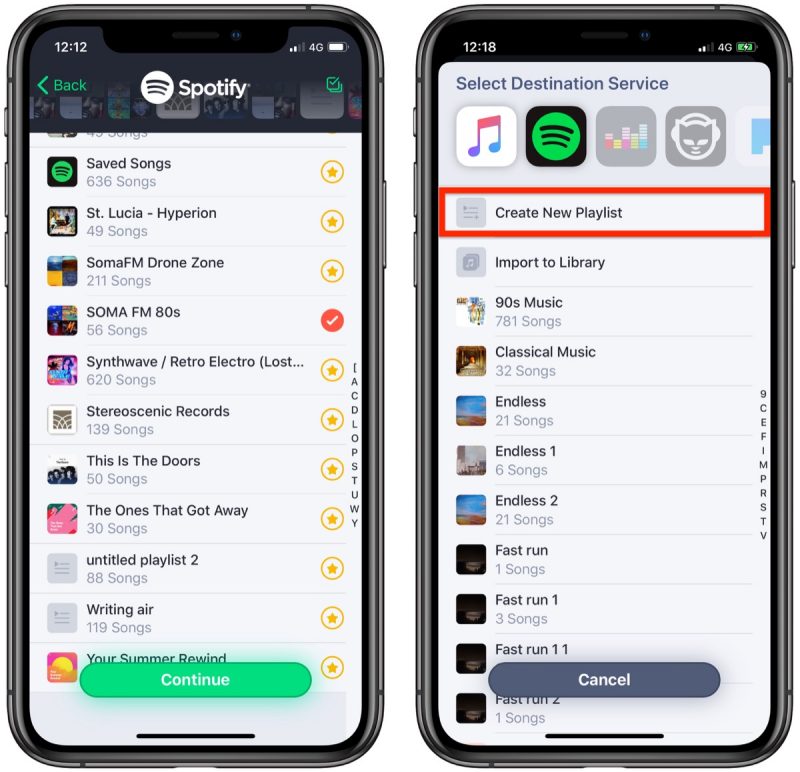
Method 1: Using a Third-Party Tool
This is probably the easiest and fastest way to transfer your Spotify playlists to Apple Music. Tools like SongShift, Playlist Export, and others can help you do this with minimal effort. Here’s how:
- Download a Reliable Tool: Head over to the website of a trusted third-party tool like SongShift or Playlist Export.
- Sign In to Spotify: Once you’ve downloaded the tool, sign in with your Spotify account.
- Select Your Playlists: Choose the playlists you want to transfer. You can select individual playlists or bulk transfer if you’re moving everything.
- Export the Playlists: Click the export button, and the tool will generate a file containing all your songs.
- Sign In to Apple Music: Now, sign in to your Apple Music account using the same tool.
- Import the Playlists: Finally, import the exported file into Apple Music, and voilà—your playlists are now in Apple Music.
Third-party tools are great because they automate the process for you. Just make sure to choose a reputable service to avoid any security risks.
Method 2: Manual Transfer
If you’re not a fan of third-party tools, you can always go the manual route. It’s a bit more time-consuming, but it’s still doable. Here’s how:
Read also:Does Patrick Mahomes Daughter Have Special Needs A Comprehensive Insight
- Export Your Spotify Playlist: Use Spotify’s built-in export feature to create a CSV file of your playlist.
- Open the CSV File: Use a spreadsheet program like Excel or Google Sheets to open the file and review the list of songs.
- Search for Songs in Apple Music: One by one, search for the songs in Apple Music and add them to a new playlist.
While this method is more labor-intensive, it gives you full control over the process. Plus, it’s a great way to refresh your playlist and maybe even discover some new tracks along the way.
Tools You Can Use to Transfer Playlists
When it comes to transferring playlists, there are several tools that can make your life easier. Here are a few of the best options:
SongShift
SongShift is one of the most popular tools for transferring playlists between streaming platforms. It supports not only Spotify and Apple Music but also other services like YouTube Music, Amazon Music, and more. The interface is user-friendly, and the process is straightforward.
Playlist Export
Another great option is Playlist Export. This tool allows you to export your Spotify playlists as CSV files, which you can then import into Apple Music manually. It’s a simple and effective solution for those who prefer a hands-on approach.
Music Manager
Music Manager is a lesser-known tool, but it gets the job done. It allows you to manage and transfer your music across different platforms, including Spotify and Apple Music. While it may not have as many features as SongShift, it’s still a solid choice.
Common Issues and How to Fix Them
Transferring playlists isn’t always smooth sailing. Here are some common issues you might encounter and how to fix them:
Issue 1: Songs Not Found
Sometimes, you might find that certain songs in your Spotify playlist aren’t available on Apple Music. This can happen due to licensing restrictions or differences in the music libraries of the two platforms. Here’s what you can do:
- Search for Alternatives: If a song isn’t available, try searching for a similar track or a different version of the song.
- Use Apple Music’s Recommendations: Apple Music often suggests similar songs based on your preferences.
Issue 2: Duplicate Songs
Another issue you might face is duplicate songs appearing in your Apple Music playlists. This can happen if you’re using a third-party tool that doesn’t filter duplicates properly. Here’s how to fix it:
- Manually Remove Duplicates: Go through your playlists and delete any duplicate songs.
- Use Apple Music’s Duplicate Finder: Apple Music has a built-in feature that helps you identify and remove duplicate songs.
Tips for a Smooth Transition
Now that you know how to transfer your playlists, here are a few tips to ensure a smooth transition:
- Organize Your Playlists: Before you start the transfer, take a moment to organize your Spotify playlists. Merge duplicates, delete unused playlists, and make sure everything is in order.
- Backup Your Playlists: Always keep a backup of your playlists, just in case something goes wrong during the transfer.
- Test the Tools: If you’re using a third-party tool, test it with a small playlist first to make sure it works as expected.
These tips might seem simple, but they can save you a lot of hassle in the long run.
How to Sync Playlists Across Devices
Once your playlists are in Apple Music, you’ll want to make sure they’re accessible across all your devices. Here’s how:
- Sign In to iCloud: Make sure your Apple devices are signed in to the same iCloud account.
- Enable iCloud Music Library: Go to Settings > Music > iCloud Music Library and toggle it on.
- Download Playlists: If you want your playlists available offline, download them on your device.
With these steps, your playlists will be synchronized across all your Apple devices, so you can enjoy your music wherever you go.
Conclusion
So, there you have it—a comprehensive guide on how to import Spotify playlists to Apple Music. Whether you choose to use a third-party tool or go the manual route, the process is pretty straightforward. Just remember to organize your playlists, backup your data, and test the tools before transferring everything.
And hey, don’t forget to explore all the cool features Apple Music has to offer. From exclusive content to advanced audio quality, there’s a lot to love about the platform. So, what are you waiting for? Make the switch, bring your playlists over, and enjoy your music the Apple way.
Got any questions or tips of your own? Drop a comment below and let us know. And if you found this article helpful, don’t forget to share it with your friends. Happy listening!
Table of Contents
- Why Import Spotify Playlists to Apple Music?
- Step-by-Step Guide: How to Import Spotify Playlist to Apple Music
- Method 1: Using a Third-Party Tool
- Method 2: Manual Transfer
- Tools You Can Use to Transfer Playlists
- Common Issues and How to Fix Them
- Tips for a Smooth Transition
- How to Sync Playlists Across Devices
- Conclusion
Article Recommendations